


How to plant seed with a tractor step by step
Mar 18, 2025 | 8 mins read


Planting seeds efficiently and effectively is a crucial aspect of modern farming. With the use of tractors, farmers can significantly improve the speed and precision of seed planting, ensuring better crop yields and less labour-intensive processes. Tractor-driven seed planting equipment, such as seed drills or planters, automate the planting process, allowing farmers to cover large areas with consistency and speed.
In this blog, we’ll walk through the steps for seed plantation using a tractor, including the equipment, preparation, and the proper techniques to ensure a successful planting process.
Step 1: Select the right tractor and planting equipment

Before you begin planting seeds, it’s important to choose the appropriate tractor and planting equipment for the task at hand. The choice of equipment depends on the type of crop being planted and the land conditions. Common planting equipment includes:
- Seed drills: These machines are ideal for planting small to medium-sized seeds. They create furrows, drop seeds at regular intervals, and then cover them with soil.
- Planters: Planters are used for larger seeds like corn or soybeans. They drop the seeds in rows, covering them with soil and sometimes applying fertilizer simultaneously.
- Air seeders: For large-scale planting, air seeders provide the precision of a drill with the efficiency of a bulk delivery system.
Ensure that the tractor’s horsepower matches the requirements of the equipment.
Step 2: Prepare the tractor and equipment

1. Inspect and maintain the tractor
Ensure the tractor is in good working condition. Check that all fluids (engine oil, hydraulic fluid, coolant) are topped up, the tires are properly inflated, and the equipment (such as the PTO) is functioning correctly.
2. Set up the seeder/planter
- Adjust the row spacing: Depending on the crop you are planting, adjust the seed drill or planter to ensure proper row spacing. For example, corn may require wider spacing (30 inches) compared to wheat or rice (6-7 inches).
- Check seed metering system: Ensure the seed metering system is calibrated to drop the correct amount of seeds per foot or meter.
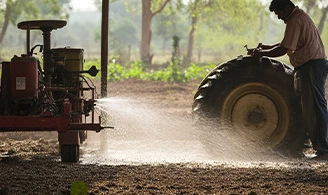
- Check fertilizer dispenser: If you plan to apply fertilizer during the planting process, ensure the fertilizer dispenser is loaded and calibrated to deliver the correct amount.
Step 3: Prepare the Soil

Before planting, it is essential to prepare the soil to ensure good seed-to-soil contact, which is crucial for seed germination. Soil preparation typically involves the following:
- Ploughing or tilling: If you haven’t already prepared the field, use a plough or tiller to break up the soil, remove weeds, and create a smooth, even surface for planting.
- Field levelling: Use a land leveller if necessary to ensure that the field is level, which helps in uniform seed depth and water distribution.
- Check soil moisture: Ensure the soil is neither too wet nor too dry. Optimal moisture is critical for seed germination.
Step 4: Load the seeds into the planter/seeder
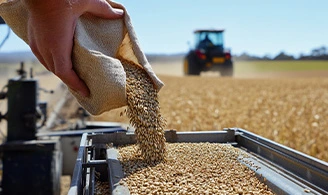
Load the appropriate seeds into the seed box of the seed drill or planter. Make sure to use the correct seed type and avoid mixing different varieties to ensure uniformity. Most modern planters have separate hoppers for fertilizer and seeds, allowing for simultaneous planting and fertilizing.
Tip: Ensure the seed box is clean before loading new seeds to prevent contamination from previous crops or debris.
Step 5: Adjust seed depth and pressure

The correct planting depth is crucial for seed germination. Seeds planted too deep may not germinate properly, while those planted too shallow may dry out or be eaten by birds.
- Adjust depth: Use the adjustable settings on your seed drill or planter to set the proper depth for the seeds. Most seeds should be planted at a depth of around 1-2 inches.
- Adjust down pressure: If your planting equipment has depth control wheels or gauge wheels, adjust them to ensure they exert enough pressure on the soil to plant seeds at the correct depth.
Step 6: Set the tractor speed

The speed at which you drive the tractor affects seed placement. If the tractor is moving too fast, the seed spacing may be uneven, and seeds may be planted too shallow. Conversely, driving too slowly can lead to excessive seed drop and clogging of the equipment.
- Ideal speed: For most seed drills and planters, a speed of around 4-6 km/h (2.5-3.5 mph) is ideal. This speed ensures that the seeds are placed properly and uniformly in the soil.
- Monitor the seed metering system: Ensure the metering system is dispensing seeds at a consistent rate. If necessary, adjust the speed of the tractor or the settings on the metering system.
Step 7: Start planting
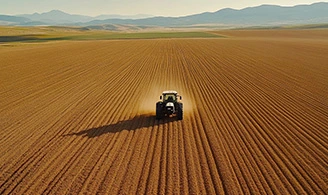
Once the tractor and equipment are set up, and the soil is ready, it’s time to start planting:
- Begin at one end of the field: Start at one end of the field and ensure that the planting equipment is aligned properly to maintain even row spacing.
- Maintain steady speed: Drive the tractor at the predetermined speed while keeping a steady hand on the wheel to ensure the rows remain straight and even.
- Monitor the equipment: While planting, check the planter regularly to ensure it is operating smoothly. Look for signs of malfunction such as clogged seed tubes or uneven seed distribution.
- Follow a straight path: Keep the tractor on a straight path to ensure that the rows are properly aligned. You may want to use row markers or GPS guidance systems to maintain precision.
Step 8: Turn and continue planting the next row
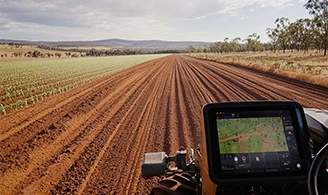
At the end of each row, make a wide turn, ensuring that the planter is properly aligned with the next row. Modern tractors often feature auto-steering systems or guidance systems that help the operator stay on track, improving planting efficiency and row consistency.
Step 9: Check seedling emergence

Once planting is complete, monitor the field for seedling emergence. This may take anywhere from 7-14 days, depending on the crop type, weather, and soil conditions.
- Inspect rows for even spacing: If certain areas of the field have uneven seed spacing or missed spots, it may be due to issues with the planter (such as a clogged seed tube or improper settings).
- Check seed depth: Ensure that the seeds are emerging at a consistent depth, which is crucial for uniform growth.
Step 10: Maintenance after planting
After completing the planting process, perform the following maintenance tasks:
- Clean the equipment: Clean any remaining seeds or soil from the seed drill or planter. This helps maintain the equipment and ensures that it’s ready for the next planting season.
- Store the tractor and equipment properly: If you’re done planting, store the tractor and planting equipment in a dry, sheltered area to protect it from the elements and ensure its longevity.
- Check for wear and tear: Inspect the tractor and planting equipment for any signs of damage, worn parts, or malfunctions. Early detection can prevent costly repairs later.
Conclusion
Using a tractor for seed planting has revolutionized agriculture by improving efficiency, reducing labour, and ensuring more uniform seed placement. By following these steps, you can ensure that your planting process is as smooth and efficient as possible, leading to better crop yields and healthier plants.
Remember, the key to successful seed planting is not just about having the right equipment but also about preparation, precision, and maintenance. By setting up the tractor and equipment properly, monitoring the process closely, and adjusting as needed, you can make the most of your tractor’s capabilities and achieve optimal planting results.
Recent Articles
Tag Cloud
Connect With Us


Mar 18, 2025

Mar 19, 2025

You May Also Like
- Read More
 Which is the Best Tractor for Farming in India?
Farming tractors are the essential companions of farmers; these robust machines help them work...
- Read More
 Choosing the Right Tractor for Groundnut Farming
Groundnut, or peanut, is grown in five states of India, namely Andhra Pradesh, Gujarat, Tamil Nadu, Karnataka, Rajasthan and Maharashtra.
- Read More
 Mahindra’s Tractor’s Potato Farming Guide
Paddy farming is one of India’s most prevalent farming methods that use small, flooded fields to cultivate rice.
- Read More
 Why Buy a Mahindra 275 DI XP Plus Tractor: Mileage, Features & Specs
The Indian Tractor market is unique—farmers are looking for an all-rounder tractor that satisfies all their needs while being affordable and powerful. One such tractor that meets the demands of Indian farmers is the Mahindra 275
