


Tractor Battery Maintenance and Replacement: Essential Tips
Mar 20, 2025 | 4 mins read


A tractor is a vital piece of machinery for farmers, and like any other piece of heavy equipment, it requires regular maintenance to ensure smooth operation. One of the key components that often gets overlooked is the tractor battery. The battery powers crucial systems such as the starter motor, lights, and electronic systems, making it an integral part of the tractor's functionality.
Proper maintenance and timely replacement of the tractor battery are essential for avoiding breakdowns and extending the life of the battery and the tractor. In this blog, we’ll guide you through the best practices for tractor battery maintenance and provide essential tips for battery replacement.
Why battery maintenance is important for your tractor
A well-maintained battery ensures that your tractor starts reliably, runs smoothly, and operates efficiently. Neglecting the battery can result in poor starting performance, electrical issues, and even a dead battery, leading to costly repairs and downtime. Proper care of the tractor battery ensures:
- Reliable engine start: The battery powers the starter motor, which is necessary to crank the engine and start the tractor.
- Efficiency: A charged and healthy battery supports the tractor's electrical systems, including lights, indicators, and other accessories.
- Longevity: Routine maintenance and timely replacement prevent premature battery failure and extend its useful life.
Essential tractor battery maintenance tips
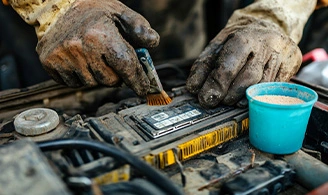
1. Clean the battery terminals
Over time, the battery terminals can accumulate dirt, grime, and corrosion, leading to poor electrical connections and potential starting issues. Keeping the terminals clean is crucial for ensuring optimal battery performance.
- What to do:
- Disconnect the battery cables (always start with the negative terminal).
- Clean the battery terminals and cable connections using a wire brush or terminal cleaning tool.
- For corrosion, use a mixture of baking soda and water to clean the terminals, or you can purchase a commercial battery terminal cleaner.
- After cleaning, dry the terminals and reconnect the cables, ensuring they are tightly secured.
Regular cleaning helps maintain strong connections and ensures that the battery receives sufficient power from the tractor’s electrical system.
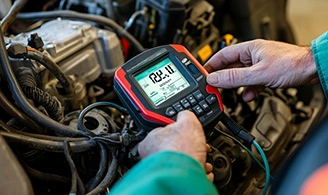
2. Check battery charge regularly
Monitoring the charge level of your tractor battery is essential to prevent it from discharging completely, which can shorten its lifespan. A battery with a low charge will not provide enough power to start the engine, especially during colder months.
- What to do:
- Use a voltmeter to check the battery’s voltage. A healthy, fully charged battery should read around 12.6 to 12.8 volts when the tractor is off.
- When the tractor is running, the voltage should read between 13.5 and 14.5 volts. This indicates that the alternator is charging the battery properly.
- If the voltage is low, it may indicate a problem with the battery or the charging system. Ensure that your alternator and voltage regulator are working properly.
3. Inspect for leaks or damage
Leaks or physical damage to the battery can lead to severe issues, including acid spills, reduced efficiency, or complete battery failure. It's crucial to inspect your battery regularly for signs of damage.
- What to do:
- Check for any visible cracks, dents, or leaks around the battery casing.
- Inspect the battery for signs of corrosion or acid buildup around the terminals, which could indicate an internal leak.
- If you notice any leaks or cracks, it’s essential to replace the battery immediately to avoid potential hazards.
4. Top Up with distilled water (if applicable)
If you’re using a flooded lead-acid battery, it’s essential to check the water levels regularly. Low water levels can cause the battery to overheat, leading to damage.
- What to do:
- Remove the battery caps (if applicable) and check the electrolyte levels inside the battery cells.
- If the water level is low, top it up with distilled water to ensure the battery plates are properly submerged.
- Never use tap water, as it can contain minerals that could damage the battery’s internal components.
- Once filled, make sure the caps are securely replaced.
5. Avoid overcharging the battery
While it’s important to keep the battery charged, overcharging can damage the battery’s internal components and reduce its lifespan.
- What to do:
- Ensure that your tractor’s alternator and charging system are working properly and not overcharging the battery.
- Overcharging can lead to excessive heat, which could cause the battery to leak or even swell.
- Consider using a battery charger with an automatic shutoff feature if you need to charge the battery separately from the tractor.
When to replace your tractor battery

Even with the best maintenance, a tractor battery has a finite lifespan. On average, a tractor battery can last between 3 to 5 years, depending on usage and maintenance. Here are some signs that indicate it may be time to replace the battery:
1. Slow engine crank
If the engine turns over slowly or has trouble starting, it could indicate that the battery is losing its charge or capacity. Over time, batteries lose their ability to hold a charge, especially after several years of use.
2. Frequent jump-starting
If you are regularly jump-starting your tractor or having trouble starting it in the morning, your battery may no longer be holding a sufficient charge.
3. Visible leaks or bulging
If you notice any signs of acid leaks, swelling, or bulging, it’s time to replace the battery. Leaks are not only hazardous but also indicate that the battery is deteriorating.
4. Old battery
If your tractor’s battery is more than 5 years old, it’s probably nearing the end of its life. Even if it’s not showing any immediate issues, replacing it proactively will help avoid unexpected failures.
How to replace your tractor battery

Replacing a tractor battery is straightforward but requires attention to safety. Here’s a simple step-by-step guide:
- Turn off the tractor: Ensure the tractor is turned off and the keys are removed from the ignition.
- Disconnect the negative cable: Always start by disconnecting the negative terminal (marked with a “-” sign) to prevent accidental sparks.
- Disconnect the positive cable: Next, disconnect the positive terminal (marked with a “+” sign).
- Remove the old battery: Carefully lift the old battery from the compartment, being mindful of any weight or acid leaks.
- Install the new battery: Place the new battery in the compartment, ensuring it fits snugly.
- Reconnect the cables: First, connect the positive terminal and then the negative terminal. Tighten the connections securely to prevent any loose connections.
- Check for proper functioning: Start the tractor and check if it starts smoothly. Also, check that all electrical systems (lights, signals, etc.) are functioning properly.
Conclusion

Maintaining and replacing your tractor battery is an essential part of tractor upkeep. A well-maintained battery ensures that your tractor starts reliably, performs optimally, and serves you for many years. Regular inspections, cleaning, and charging checks will keep your battery in top shape, while timely replacements will help avoid unexpected breakdowns.
By following the tips and guidelines in this blog, you will be able to maximize the lifespan of your tractor battery and keep your machine running at its best. Remember, a little attention to your tractor’s battery goes a long way in maintaining smooth operations in the field!
Recent Articles
Tag Cloud
Connect With Us


Mar 19, 2025

Mar 20, 2025

You May Also Like
- Read More
 Which is the Best Tractor for Farming in India?
Farming tractors are the essential companions of farmers; these robust machines help them work...
- Read More
 Choosing the Right Tractor for Groundnut Farming
Groundnut, or peanut, is grown in five states of India, namely Andhra Pradesh, Gujarat, Tamil Nadu, Karnataka, Rajasthan and Maharashtra.
- Read More
 Mahindra’s Tractor’s Potato Farming Guide
Paddy farming is one of India’s most prevalent farming methods that use small, flooded fields to cultivate rice.
- Read More
 Why Buy a Mahindra 275 DI XP Plus Tractor: Mileage, Features & Specs
The Indian Tractor market is unique—farmers are looking for an all-rounder tractor that satisfies all their needs while being affordable and powerful. One such tractor that meets the demands of Indian farmers is the Mahindra 275
