


How to Attach a Rotavator to a Tractor – Step-by-Step Guide
Mar 17, 2025 | 6 mins read


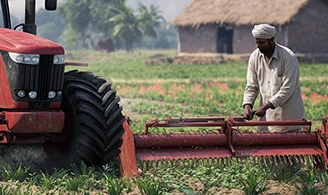
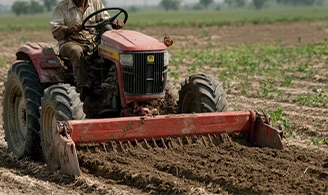
How To Attach The Rotavator With The Tractor
When it comes to preparing soil for planting, a rotavator (also known as a rotary tiller) is one of the most efficient tools available for breaking up and aerating the ground. By attaching a rotavator to your tractor, you can save time and effort during land preparation, ensuring that your crops get the best possible beginning.
However, attaching a rotavator to a tractor requires careful attention to ensure safety, efficiency, and the proper functioning of the equipment. In this blog, we will walk you through the steps on how to attach a rotavator to your tractor, providing you with the knowledge to do the task correctly.
What you need:
- Tractor with the necessary PTO (Power Take-Off) system
- Rotavator (rotary tiller)
- Proper tools (if needed)
- Protective gear (gloves, safety boots, etc.)
Step-by-step guide to attaching a rotavator with a tractor
1. Prepare the tractor and rotavator
Before you begin, make sure both the tractor and rotavator are in good working condition.
- Inspect your tractor: Ensure that your tractor is well-maintained, with a fully charged battery, proper fuel level, and working hydraulic system (if applicable).
- Inspect your rotavator: Check the rotavator’s blades, drive shafts, and overall condition. Ensure the equipment is free from any dirt, debris, or damage. If necessary, lubricate the moving parts to ensure smooth operation.
2. Position the tractor and rotavator
Once everything is inspected, position the tractor and rotavator in the correct alignment.
- Align the tractor: Position the tractor on a flat surface with the rear of the tractor facing the rotavator.
- Align the rotavator: Roll the rotavator forward or backward to align the hitch pins with the tractor’s 3-point hitch. The rotavator should be directly behind the tractor with enough space to maneuver comfortably.
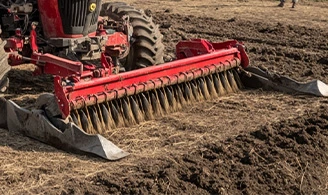
3. Attach the 3-point hitch

The 3-point hitch is the mechanism that will connect the tractor to the rotavator. It consists of three parts: two lower lift arms and a top link.
- Lower lift arms: Lift the two lower lift arms on the tractor’s 3-point hitch and attach them to the two lower pins on the rotavator. This will support the weight of the rotavator during operation.
- Top link: Now, attach the top link of the tractor to the rotavator’s upper hitch point. The top link allows for adjusting the angle and height of the rotavator during use.
- Adjusting the length: You may need to adjust the length of the top link to ensure that the rotavator is level when in use. The rotavator should sit parallel to the ground for optimal performance.
4. Attach the PTO shaft
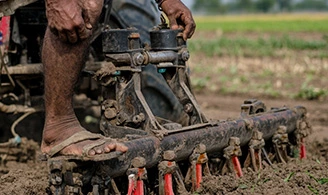
The Power Take-Off (PTO) shaft is the key to powering the rotavator. The PTO connects the tractor’s engine power to the rotavator’s blades.
- Align the PTO shaft: With the tractor in neutral, back it up slightly until the PTO shaft aligns with the PTO output shaft on the tractor. The PTO shaft should be properly fitted and secured.
- Lock the PTO shaft: Secure the PTO shaft to the tractor’s PTO output by engaging the locking mechanism. Make sure the PTO is securely attached and that there is no wobbling or slack.
5. Check the safety mechanisms
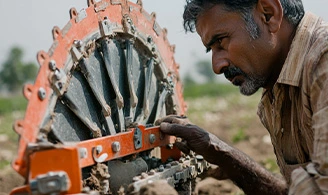
Before starting the tractor, take a moment to check the safety mechanisms and ensure everything is in place.
- Safety guards: Ensure the safety shields on the rotavator are in place and properly secured. These guards are essential to prevent debris from being thrown during operation.
- PTO shield: Double-check that the PTO shaft is covered with a protective shield. This helps prevent injuries from accidental contact with the rotating shaft.
6. Adjust the working depth

The working depth of the rotavator is an important setting that will determine how deep the blades dig into the soil. Adjust the depth to suit your needs.
- Adjust the top link: Use the top link to adjust the height of the rotavator. If the ground is very hard, you may want to set the rotavator deeper to break up compacted soil.
- Test the depth: Slowly lower the rotavator and observe how it interacts with the ground. Adjust as needed to ensure the blades are digging at the right depth for optimal soil preparation.
7. Engage the PTO and begin operation
With everything in place and the rotavator properly attached, it’s time to start working.
- Start the tractor: Turn on the tractor and engage the PTO by pulling the PTO engagement lever or switch. This will begin the rotation of the rotavator blades.
- Test the functioning: Slowly drive the tractor forward while observing how the rotavator works. Make sure that the blades are turning smoothly and cutting through the soil efficiently.
- Adjust the speed: Depending on the type of soil and the desired depth of tilling, adjust the tractor’s speed to ensure the rotavator works effectively. For hard soil, you may need to go slower, while for lighter tasks, you can increase the speed.
8. Monitor and maintain during use

During operation, always monitor the tractor and rotavator for any signs of problems.
- Check the blades: If the soil is too compact or rocky, check the blades periodically for wear or damage.
- Adjust the depth as needed: Depending on soil conditions, you may need to adjust the working depth during use.
- Take breaks: It’s always a good idea to stop periodically, inspect the machinery, and ensure that everything is working as it should.
Conclusion
Attaching a rotavator to your tractor is a straightforward process, but it requires attention to detail to ensure proper setup and safe operation. By following the steps outlined in this blog, you can confidently attach the rotavator and prepare your soil for planting with ease. Proper maintenance, regular checks, and adjusting the equipment according to soil conditions will ensure that your tractor-rotavator combination remains efficient and reliable for all your farming tasks.
Now that you know how to attach a rotavator with your tractor, you can make the most of your land preparation and enjoy a successful farming season ahead!
Recent Articles
Tag Cloud
Connect With Us


Mar 17, 2025
Mar 17, 2025

You May Also Like
- Read More
 Which is the Best Tractor for Farming in India?
Farming tractors are the essential companions of farmers; these robust machines help them work...
- Read More
 Choosing the Right Tractor for Groundnut Farming
Groundnut, or peanut, is grown in five states of India, namely Andhra Pradesh, Gujarat, Tamil Nadu, Karnataka, Rajasthan and Maharashtra.
- Read More
 Mahindra’s Tractor’s Potato Farming Guide
Paddy farming is one of India’s most prevalent farming methods that use small, flooded fields to cultivate rice.
- Read More
 Why Buy a Mahindra 275 DI XP Plus Tractor: Mileage, Features & Specs
The Indian Tractor market is unique—farmers are looking for an all-rounder tractor that satisfies all their needs while being affordable and powerful. One such tractor that meets the demands of Indian farmers is the Mahindra 275
